
Last week you recorded your song on your phone. Maybe you cringed a little when you played it back. Good. That means you started. Now it’s time to record guitar on your computer.
Today we take the next step: getting your guitar into your computer and hearing it come back out. That’s it. No mixing, no effects, no perfect take. Just plug in, strum a chord, and hear it.
I remember the first time I did this. I didn’t have an interface so, I rigged up a cable into the 1/8 inch input on the back of my computer and hoped for the best. It sort of worked. Sort of. My guitar came in so quiet I could barely see it on the meter, and I spent more time fighting the levels than playing. In November 2011, I finally broke down and dropped the cash on a Focusrite Scarlett 2i2. It was a first generation one; the Scarlett line had only come out that year. That little red box was the start of my home studio.
The good news is you get to skip the part where I struggled. There are a few settings to get right, and if one of them is off, you hear nothing and start wondering if you broke something. You didn’t. I’m going to walk you through it in order, one step at a time, so you can get there in one sitting.
Set aside about 45 minutes. Some of that is waiting for downloads.
First, a word about Mac and PC
I’ll be honest with you: I’ve always been a Mac guy. I started in GarageBand and I make my records in Logic. But a lot of you are on a Windows laptop, and Logic doesn’t run on Windows.
So for this series I’m using Reaper. It runs on both Mac and Windows, it’s free to try for 60 days, and after that it’s $60. That way we’re all looking at the same screen. Whenever a step is different on a PC, I’ll call it out like this:
On a PC: what to do differently on Windows.
If you’re on a Mac and already have GarageBand, you can follow along there instead. The ideas are exactly the same; the buttons are just in different places.
What you need on the table
- Your laptop, plugged into the wall
- Your audio interface and the USB cable that came with it (I’m using a Focusrite Scarlett Solo as the example, but most interfaces work the same way)
- Your electric guitar, or an acoustic with a pickup, and one guitar cable
- Wired headphones (earbuds are fine). Bluetooth headphones like AirPods won’t work here: they can’t plug into the interface, and the slight Bluetooth delay makes it hard to play in time
That’s it. No microphone today and no amp. We’ll get to those.
One thing about headphones: the Scarlett has a big headphone jack, and most earbuds have a small one. If yours don’t fit, you’ll need a cheap 1/8″ to 1/4″ adapter. They’re a few bucks, and a lot of headphones come with one in the box.
Step by step
Do these in order. Don’t skip ahead, even if a step seems obvious.
Part 1: Plug in the interface and run its setup
Plug the interface into your laptop with its USB cable. The first time you do this, a newer Scarlett shows up on your computer like a thumb drive. Open it and click “Click Here To Get Started.” It walks you through a short setup in your web browser.
When it asks you to install Focusrite Control 2, do it. Then open Focusrite Control 2 and let it update the interface if it asks. Don’t unplug anything while it updates.
On a PC: this step matters more for you. Installing Focusrite Control 2 also installs the driver Windows needs to talk to the interface. Without it, nothing else works. On a Mac, the interface works without a driver.
If you have a different interface, go to the maker’s website, find the downloads page for your model, and install whatever it lists for your computer.
Part 2: Install Reaper
Go to reaper.fm, click Download, and pick the version for your computer (Windows or macOS). Install it like any other program. When it opens and asks about the trial, just keep going. You have 60 days, and everything works during the trial.
Part 3: Plug in your guitar and headphones
- Plug your guitar cable into the front jack labeled Input 1 (the round one for a guitar cable). On the Scarlett Solo, the other input, the XLR on the back, is for a microphone. We’re not using it today.
- Press the Inst button so it lights up green. This tells the interface a guitar is plugged in.
- Plug your headphones into the headphone jack on the front.
- Turn the Direct Monitor button on (it lights up green). This sends your guitar straight to your headphones so you hear yourself with no delay.
- Turn the headphone volume knob about halfway up.
Play a chord. You should hear your guitar in your headphones right now, even before Reaper is set up. If you do, the interface is working. That’s your first win of the night.
It will probably sound thin and plain. That’s normal. A guitar plugged straight into an interface doesn’t sound like your amp. We’ll fix that later in the series. Today is just about getting sound through.
Part 4: Set the input level
There’s a ring of light around the gain knob for Input 1. Play the loudest strum you’ll play in your song and watch it:
- Green means good.
- Amber means you’re getting close to too loud.
- Red means too loud. Turn the knob down.
Turn the knob up until your loudest strum stays green, with maybe a flicker of amber on the hardest hit. When in doubt, go a little lower. Too quiet is easy to fix later; too loud is ruined for good. We’ll go deeper on this in Step 3.
Part 5: Tell Reaper to use your interface
This is the step that trips most people up, so go slow. The first time you open Reaper, it will tell you that you haven’t selected an audio device yet and ask if you want to select one now. Click Yes. That takes you straight to the settings page in number 3 below.
- Open Reaper.
- Open the settings. On a Mac, the quickest way is to press Cmd and comma together (Cmd+,). You can also find it in the menus at the top; depending on your version, it’s called Settings or Preferences.
- In the list on the left, find Audio and click Device under it.
- In the Audio Device menu, choose your Scarlett Solo.
- Click OK.
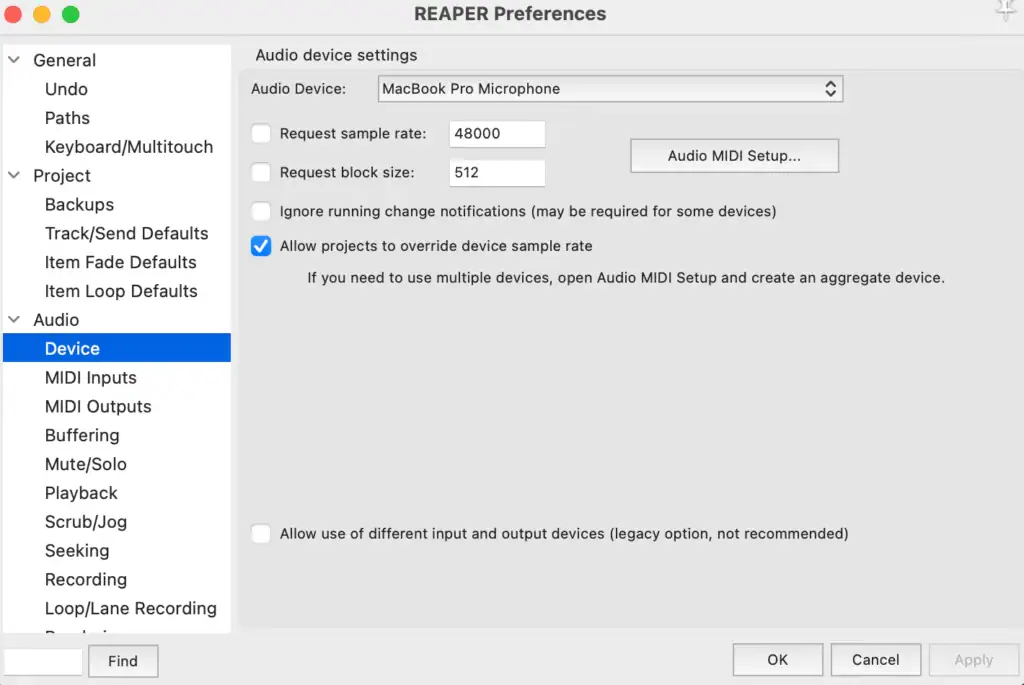
One more Mac thing: the first time Reaper tries to listen to your interface, your Mac may ask whether Reaper can use the microphone. Click Allow, even though you’re plugging in a guitar. Your Mac treats every input as a microphone, and if you say no, Reaper hears nothing.
On a PC: open Options, then Preferences. Click Device under Audio. Set Audio system to ASIO, and set ASIO driver to Focusrite USB ASIO. Click OK. If you don’t see Focusrite USB ASIO in the list, go back to Part 1. The driver didn’t install.
Part 6: Make a track and arm it
- Click the + button in the big empty gray area on the left side of Reaper, or double click anywhere in that area. A new track appears. (You can also go to Track, then Insert new track.)
- Double click the track’s name box and type Guitar. Name every track before you record. “Track 1” means nothing six months from now.
- Click the round red button on the track. This is called arming the track. It means “get ready to record on this one.”
- Next to the red button there’s a small box showing the track’s input. Click it, choose Input: Mono, then Input 1. This tells Reaper which input your guitar is in.
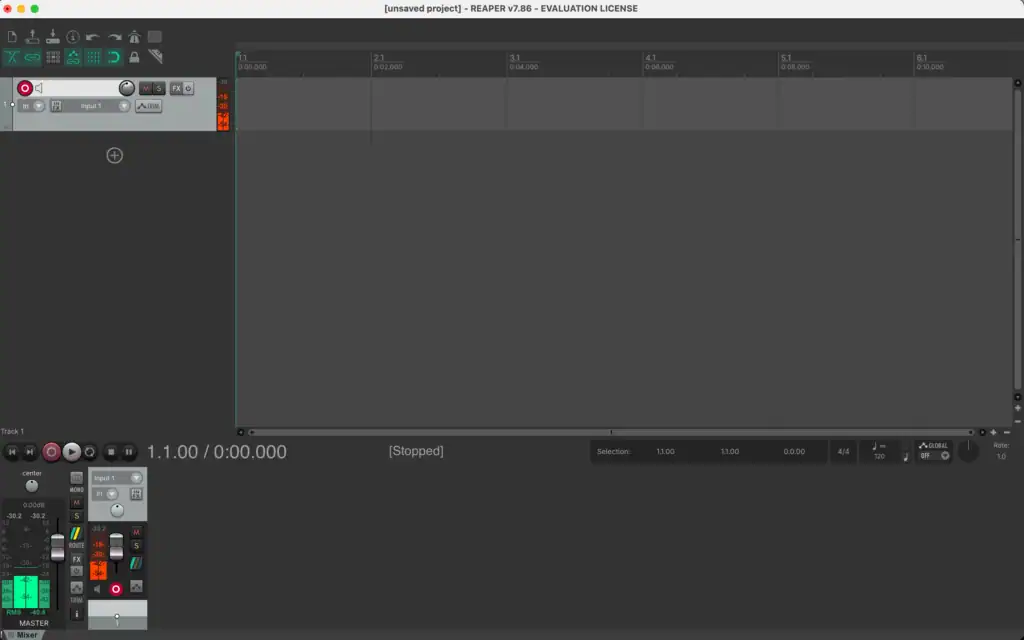
Play a chord. You should see the track’s meter bounce. That’s your guitar coming into the computer.
Part 7: Fix the double sound
Next to the red arm button there’s a small speaker icon. That’s Reaper’s own monitoring, and clicking it switches it on and off. When it’s red, Reaper is also sending your guitar to your headphones. The Scarlett’s Direct Monitor is already doing that, so you’d hear your guitar twice, or it would sound strange and swirly.
Make sure the speaker icon is gray, not red. If it’s red, click it once. Leave Direct Monitor on the interface. Now you hear one clean signal, with no delay.
Part 8: Record your first take
- Click the record button at the bottom of Reaper (the round red one), or press Cmd+R.
On a PC: use Ctrl wherever I say Cmd. Cmd+R on a Mac is Ctrl+R on Windows, and that’s true for most Reaper shortcuts.
- Play anything. Your song’s first verse, a few chords, it doesn’t matter.
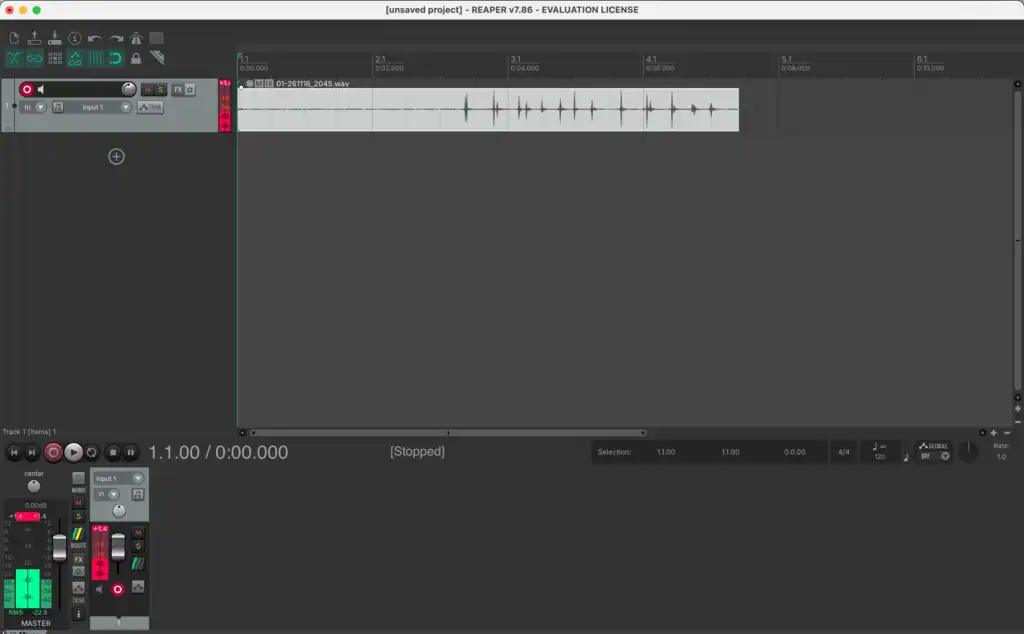
- Press the spacebar to stop. A box pops up asking which files to save or delete. (If you stop with Cmd+R instead, Reaper keeps the take without asking.) Click Save All.
- Click near the start of the track and press the spacebar to play it back.
That’s your guitar, recorded into your computer. Save the project (File, then Save project) and give it your song’s name.
If you hear nothing
It happens to everybody. Work down this list in order. It’s almost always one of the first three.
- Is the headphone volume up? The knob on the front of the interface, not the one on your laptop.
- Is Direct Monitor on? It should be lit green.
- Is the guitar’s volume knob up? Seriously. I’ve done this more times than I’d like to admit.
- Is the guitar in the right input? Front jack, Input 1, with Inst lit. If you have an older Scarlett Solo (3rd Gen or earlier), the guitar jack is Input 2, so choose Input 2 in Reaper instead.
- Does Reaper see the interface? Go back to Part 5 and check the device settings. On a Mac, also open System Settings, then Privacy & Security, then Microphone, and make sure REAPER is switched on.
- Is the track armed and set to Input 1? The red button should be lit, and the input box should say Input 1.
- Try a different USB port on your laptop, and use the cable that came with the interface if you can.
On a PC: if the meter moves in Reaper but you hear crackles or pops, go to the device settings in Part 5 and click ASIO Configuration. Raise the buffer size one step (for example from 128 to 256). A bigger buffer gives your laptop more breathing room.
Still stuck? Close Reaper, unplug the interface, plug it back in, and open Reaper again. You’d be surprised how often that’s all it takes.
Your Step 2 homework
- Get sound through. Work through Parts 1 to 8 until you can hear your guitar and see the meter move in Reaper.
- Record one take of your song. The same song from Step 1. Use your Song Map to remember the order of the parts. Play it start to finish, mistakes and all.
- Save it. Name the project with the song title and today’s date, the same way you named your phone demo.
- Listen to both. Play your phone demo, then your Reaper take. Notice anything different? Write one thing down on your Song Map.
If you only get through the first one tonight, that’s a win. Setup is the hardest part of this whole series, and once it’s done, it’s done.
What’s next
Next time is Step 3: recording a clean guitar track, and the one question every beginner asks, “how loud should I record?” It’s the topic the forums argue about most, and I’ll make it simple. If you’ve ever had a recording come out crunchy and distorted when you didn’t want it to, this one’s for you.
Until then, get that first sound through. And when you hear your guitar come out of your computer for the first time, take a second to enjoy it. A lot of people never get this far.
Hit reply or leave a comment and tell me how it went, especially if you got stuck on a step. It helps me make the next one better.